A Beginner's Guide to Java JDBC: Connecting JAR Files and Essential Concepts
Introduction
Java Database Connectivity (JDBC) is a Java API that provides a standard way to interact with relational databases. Whether you're building a simple desktop application or a complex enterprise system, understanding JDBC is essential for connecting your Java applications with databases. In this beginner's guide, we will explore the fundamentals of JDBC, including how to connect JAR files and cover the key concepts you need to know.
What is JDBC?
JDBC stands for Java Database Connectivity and is a Java API that provides a set of classes and interfaces for accessing and manipulating databases. It allows Java applications to interact with various database management systems, such as MySQL, Oracle, and SQL Server, by providing a standardized interface.
Setting up the environment
Before diving into JDBC, you need to set up your development environment properly. This involves installing the Java Development Kit (JDK) and configuring the classpath.
Installing Java Development Kit (JDK)
To begin, download and install the latest version of JDK from the Oracle website. Follow the installation instructions specific to your operating system.
Configuring the Classpath
The classpath is a parameter that tells the Java Virtual Machine (JVM) where to find classes and libraries. For JDBC, you need to include the JDBC driver JAR file in the classpath. You can either set the classpath using environment variables or specify it while compiling and running your Java programs.
JDBC Drivers
Type 1: JDBC-ODBC Bridge Driver
This driver uses the ODBC (Open Database Connectivity) API to connect Java applications with databases. It requires the ODBC driver for each database you want to connect to.
Type 2: Native API Driver
The Type 2 driver uses the database-specific API to communicate with the database. It converts JDBC calls into native API calls. This driver requires database-specific libraries to be installed on the client machine.
Type 3: Network Protocol Driver
The Type 3 driver uses a middleware component to translate JDBC calls into a database-specific network protocol. It requires the middleware to be installed on both the client and the server.
Type 4: Pure Java Driver
The Type 4 driver is a fully Java-based driver that communicates directly with the database server. It does not require any external software and is platform-independent.
Establishing a Database Connection
To connect to a database using JDBC, you need to load the appropriate driver class, create a connection object, and handle any exceptions that may occur.
Loading the Driver Class
Before establishing a connection, you need to load the JDBC driver class using the Class.forName() method. For example, to load the MySQL JDBC driver class:
Class.forName("com.mysql.cj.jdbc.Driver");
Creating a Connection
To create a connection, you need to provide the database URL, username, and password. The URL varies depending on the database you are using. Here's an example of creating a connection to a MySQL database:
String url = "jdbc:mysql://localhost:3306/mydatabase";
String username = "root";
String password = "mypassword";

Connection connection = DriverManager.getConnection(url, username, password);
Handling Connection Exceptions
When establishing a connection, exceptions such as
ClassNotFoundExceptionorSQLExceptionmay occur. It's crucial to handle these exceptions appropriately to ensure graceful error handling and prevent resource leaks.
Executing SQL Statements
Once connected to the database, you can execute SQL statements using either Statement or PreparedStatement objects.
Statement vs. PreparedStatement
'Statement'is used to execute static SQL statements, whereas 'PreparedStatement'is used for parameterized queries. Prepared statements offer performance benefits and protect against SQL injection attacks.Executing Queries
To execute a SELECT query and retrieve results, you can use the
executeQuery()method on theStatementorPreparedStatementobject. The results are returned as aResultSetobject.Executing Updates
To execute INSERT, UPDATE, or DELETE statements, you can use the
executeUpdate()method. It returns the number of affected rows.
Retrieving and Manipulating Data
Retrieving Results from Queries
After executing a SELECT query, you can retrieve the results using the
ResultSetobject. TheResultSetprovides methods to navigate through the result set and access the individual columns.Here's an example of retrieving data from a
ResultSetStatement statement = connection.createStatement(); ResultSet resultSet = statement.executeQuery("SELECT * FROM users"); while (resultSet.next()) { int id = resultSet.getInt("id"); String name = resultSet.getString("name"); int age = resultSet.getInt("age"); // Do something with the retrieved data System.out.println("ID: " + id + ", Name: " + name + ", Age: " + age); } resultSet.close(); statement.close();In the example above, we execute a SELECT query to retrieve all rows from the "users" table. The
next()method is used to move the cursor to the next row in the result set. ThegetInt(),getString(), and other similar methods retrieve the values of specific columns based on their names or indexes.Updating Data
To update data in the database, you can use
StatementorPreparedStatementobjects with appropriate SQL statements.Here's an example of updating data using a
PreparedStatementString updateQuery = "UPDATE users SET age = ? WHERE id = ?"; PreparedStatement preparedStatement = connection.prepareStatement(updateQuery); preparedStatement.setInt(1, 25); // Set the new age value preparedStatement.setInt(2, 1); // Set the id of the user to update int rowsAffected = preparedStatement.executeUpdate(); if (rowsAffected > 0) { System.out.println("Data updated successfully."); } preparedStatement.close();In the example above, we use a parameterized query to update the "age" column of a specific user. The placeholders (
?) in the SQL statement are replaced with actual values using thesetInt()method. TheexecuteUpdate()method returns the number of rows affected by the update operation.
Closing Resources
Closing ResultSet
When you have finished working with a
ResultSetobject, it's important to close it to release database resources and avoid memory leaks. You can close theResultSetby calling theclose()method. Here's an example of closing aResultSetResultSet resultSet = statement.executeQuery("SELECT * FROM users"); // Process the ResultSet resultSet.close();Closing the
ResultSetshould be done as soon as you have retrieved the necessary data from it.Closing Statement and Connection
In addition to closing the
ResultSet, it's crucial to close theStatementandConnectionobjects after you have finished executing SQL statements and working with the database.Here's an example of closing a
StatementandConnection:Statement statement = connection.createStatement(); // Execute SQL statements statement.close(); connection.close();Closing the
StatementandConnectionobjects is essential to release resources and free up database connections.
Exception Handling
Exception handling is an essential aspect of working with JDBC. Various exceptions can occur during database operations, such as connection failures, SQL syntax errors, or data retrieval issues. Properly handling these exceptions is crucial for graceful error recovery and effective troubleshooting.
When working with JDBC, consider the following best practices for exception handling:
Catch specific exceptions
Catch specific exceptions related to JDBC operations, such as
SQLException, to handle them appropriately. This allows you to provide specific error messages or perform specific error recovery actions based on the type of exception encountered.Log error messages:
Logging error messages help in troubleshooting and debugging. Utilize logging frameworks like Log4j or java.util.logging to record relevant information about exceptions, including stack traces, timestamps, and any additional context that can aid in identifying and resolving issues.
Graceful error handling
Implement graceful error handling by providing user-friendly error messages or fallback mechanisms when exceptions occur. Avoid exposing sensitive information in error messages, but provide enough information to assist users or developers in understanding and resolving the issue.
Transaction management
Implement proper transaction management to ensure data consistency and reliability. Rollback transactions in case of exceptions to prevent partial updates or data corruption.
Finally- block
Use the
finallyblock to ensure that resources, such asResultSet,Statement, andConnection, is properly closed, even if an exception occurs. This prevents resource leaks and guarantees that connections are released, regardless of the execution path.
Best Practices and Tips
Here are some additional best practices and tips for working with JDBC:
Use parameterized queries
Utilize prepared statements and parameterized queries to prevent SQL injection attacks and improve performance. Parameterized queries separate SQL logic from user input, enhancing security and promoting code reusability.
Connection pooling
Implement connection pooling to efficiently manage database connections. Connection pooling minimizes the overhead of creating new connections for each request, leading to improved performance and scalability.
Batch updates
When performing multiple inserts, updates, or deletes, consider using batch updates. Batch updates allow you to group multiple SQL statements into a single database call, reducing network overhead and improving performance.
Metadata retrieval
JDBC provides metadata APIs that allow you to retrieve information about database schemas, tables, columns, and more. Utilize metadata retrieval to dynamically work with database structures, such as determining table names or column types at runtime.
Use appropriate fetch sizes
For large result sets, consider setting an appropriate fetch size to control how many rows are retrieved from the database at a time. This helps optimize memory usage and can enhance performance when dealing with large amounts of data.
Connection timeout
Set an appropriate connection timeout to avoid indefinite waiting for a database connection. This ensures that your application does not hang if a connection cannot be established within a specified time limit.
Example
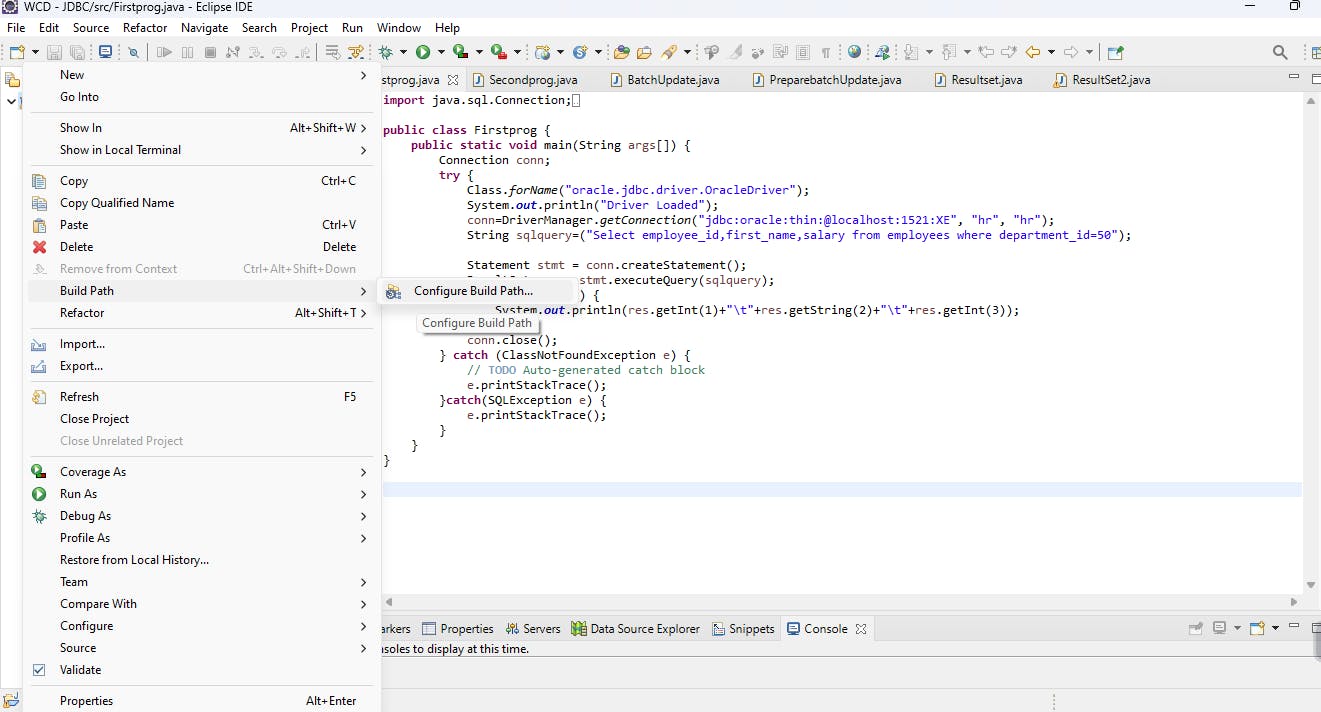
Go To > build path > Configure build path

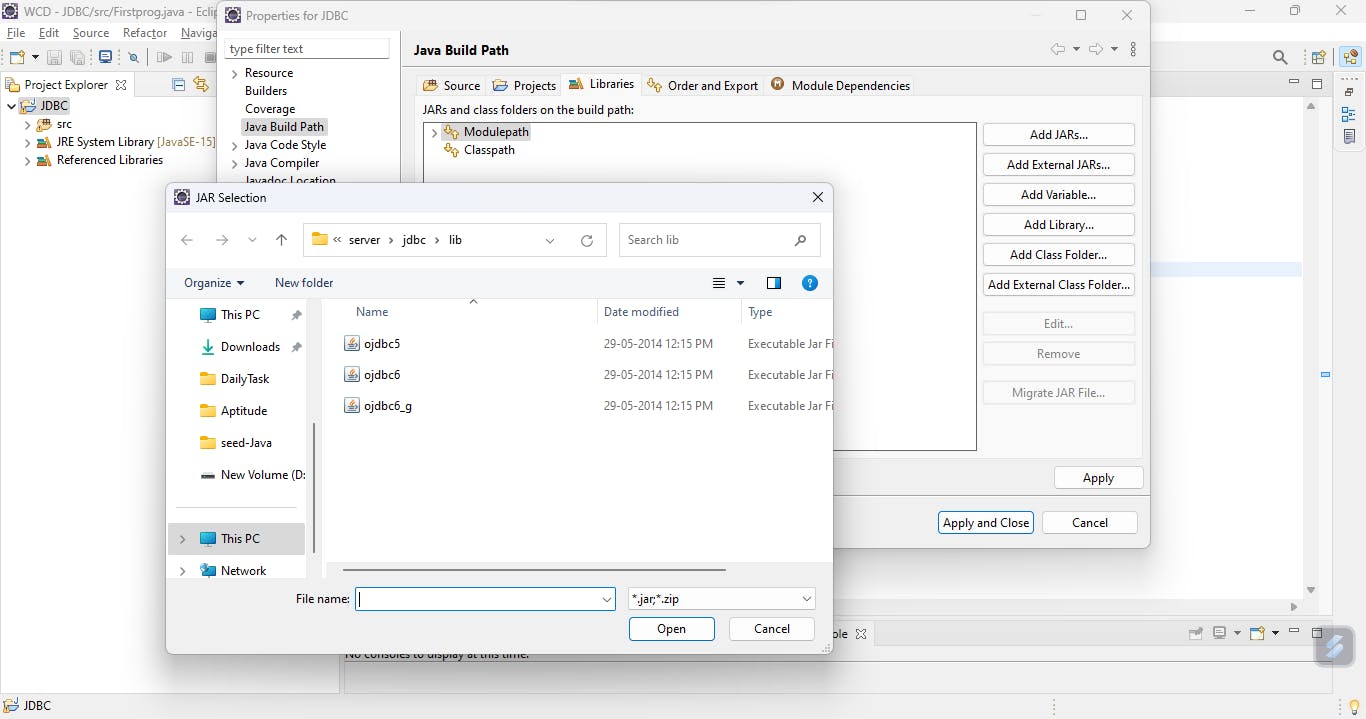
select Class path > Add external Jars > Browse and select the appropriate Jar files for youre Sql version > Apply and close , I`m using Oracle Sql.

Now create a Java Class file > And Add the Follwing Code.
import java.sql.Connection;
import java.sql.DriverManager;
import java.sql.ResultSet;
import java.sql.SQLException;
import java.sql.Statement;

public class Firstprog {
    public static void main(String args[]) {
        Connection conn;
        try {
            Class.forName("oracle.jdbc.driver.OracleDriver");
            System.out.println("Driver Loaded");
            conn=DriverManager.getConnection("jdbc:oracle:thin:@localhost:1521:XE", "hr", "hr");
            String sqlquery=("Select employee_id,first_name,salary from employees where department_id=50");

            Statement stmt = conn.createStatement();
            ResultSet res = stmt.executeQuery(sqlquery);
            while(res.next()) {
                System.out.println(res.getInt(1)+"\t"+res.getString(2)+"\t"+res.getInt(3));
            }
            conn.close();
        } catch (ClassNotFoundException e) {
            // TODO Auto-generated catch block
            e.printStackTrace();
        }catch(SQLException e) {
            e.printStackTrace();
        }
    }
}
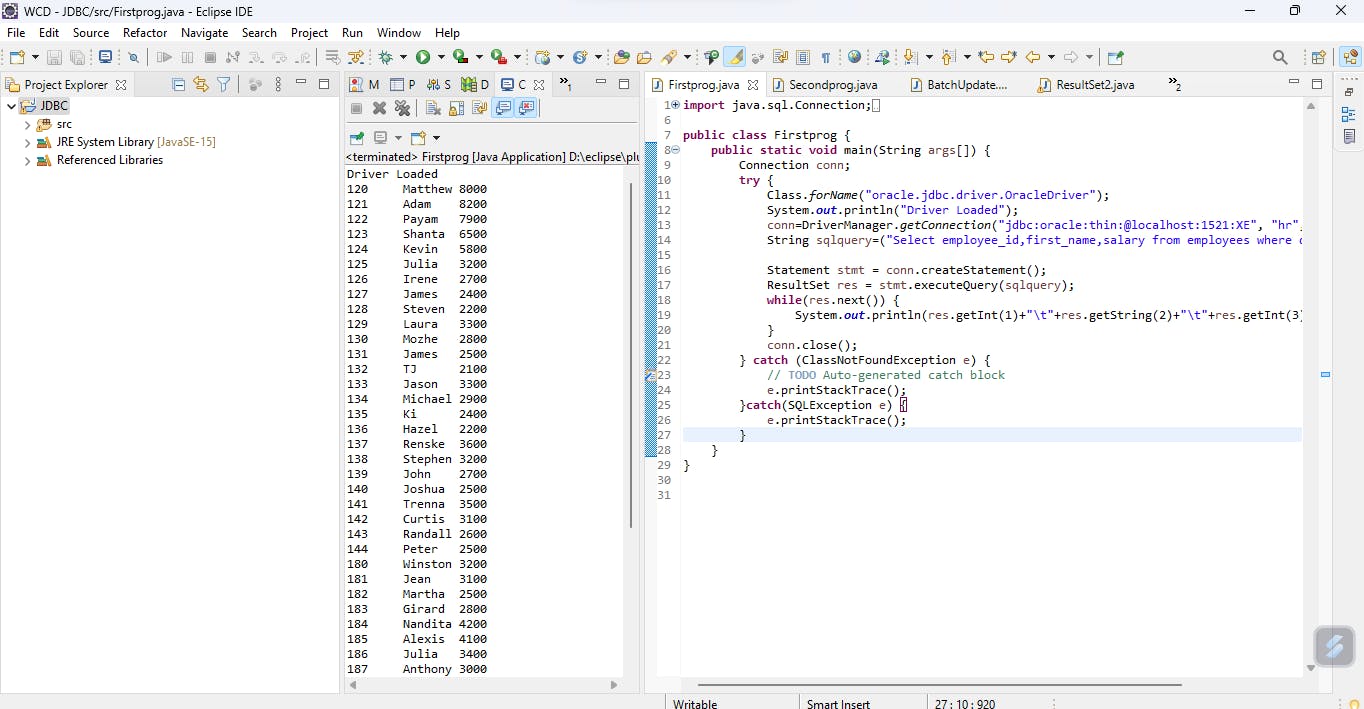
Output

Conclusion
In this beginner's guide to Java JDBC, we covered important aspects of connecting to databases, retrieving data, updating records, and handling exceptions. We explored the process of setting up the environment, understanding JDBC drivers, establishing connections, executing SQL statements, and closing resources. We also discussed best practices for exception handling, tips for efficient JDBC usage, and techniques to promote security and performance.
By mastering JDBC, you have acquired a fundamental skill for building robust and data-driven Java applications. JDBC provides you with the ability to seamlessly interact with databases, perform data manipulation, and retrieve information as needed. Remember to continue exploring JDBC's advanced features and consider incorporating frameworks like JPA (Java Persistence API) or ORM (Object-Relational Mapping) libraries for more sophisticated database operations.
With this knowledge and continuous learning, you are well-equipped to leverage the power of JDBC and build applications that leverage the capabilities of relational databases to their fullest potential. Happy coding!
